Page 3
ALPEN KREUZER INSTRUCTION BOOKLET
compiled and published by
All copyright reserved; reproduction or translation, in whole or in part, is permitted only with the prior written consent of e.k.s. Alpenkreuzer in Sliedrecht/Holland.
Price of the Alpen Kreuzer instruction booklet: f 3.50.
FOREWORD
Dear Alpen Kreuzer owner,
We are pleased to be able to offer you this booklet with operating instructions and tips for your Alpen Kreuzer.
It is our sincere wish that you will enjoy your purchase for many years. Not only during your holidays, but at weekends as well.
Make the most of the possibilities your Alpen Kreuzer has brought within your reach!
It now also depends on you whether, through correct handling and good maintenance, you will continue to enjoy your Alpen Kreuzer in the future. There are certain operations that are simply necessary for the upkeep of your Alpen Kreuzer, while leaving it pitched on a fixed site for a whole season, for instance, is not advisable.
If you follow the instructions and tips we have put together for you out of our many years of experience, you will not only become a seasoned camper who is not caught out by unexpected surprises, but you will also considerably reduce the risk of breaking down on the road.
We therefore advise you to read this booklet right through and to discuss it with your family, so that you set off well informed.
We wish you many thousands of kilometres of "carefree" driving and a great deal of holiday and weekend enjoyment with your Alpen Kreuzer.
The management of
SLIEDRECHT - HOLLAND
Page 4
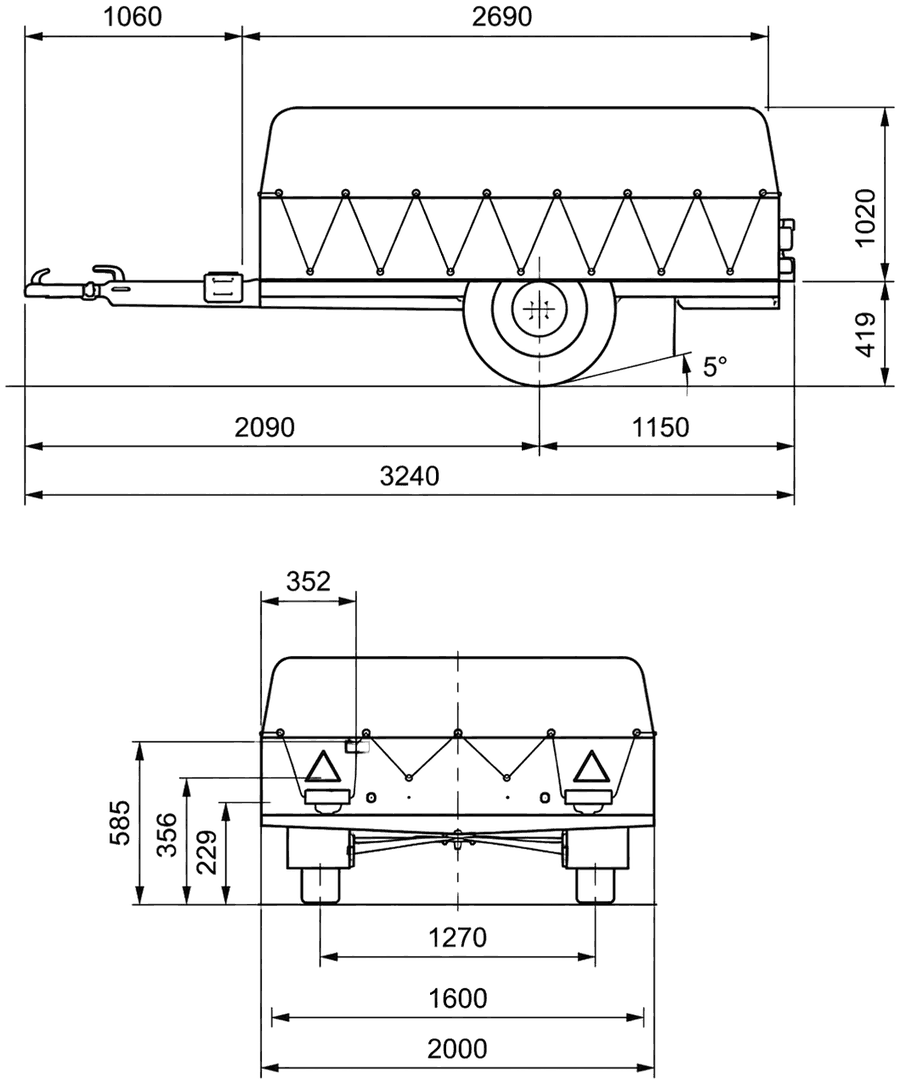
TECHNICAL DATA
| Duet: | Select: | Allure: | Super GT: | |
|---|---|---|---|---|
| height when closed | 98 cm | 109 cm | 102 cm | 101 cm |
| width when closed | 160 cm | 159 cm | 160 cm | 159 cm |
| length incl. drawbar | 315 cm | 315 cm | 315 cm | 344 cm |
| length without drawbar | 210 cm | 210 cm | 210 cm | 245 cm |
| coupling height of the ball (top of ball to the ground) | 40 cm | 40 cm | 40 cm | 40 cm |
| diameter of the coupling ball | 50 mm | 50 mm | 50 mm | 50 mm |
| tyre size | 520x13" | 520x13" | 520x13" | 520x13" |
| weight | 275 kg | 300 kg | 300 kg | 320 kg |
| luggage that may be carried | 275 kg | 250 kg | 250 kg | 230 kg |
| permitted total weight | 550 kg | 550 kg | 550 kg | 550 kg |
| permitted total weight for Belgium | 500 kg | 500 kg | 500 kg | 500 kg |
| electrical system: | 12 volt | 12 volt | 12 volt | 12 volt |
- brake light:
- 1-pole, 21 W, bayonet fitting.
- tail light:
- 2 festoon bulbs, 5 W, 38 mm
- number plate light:
- 2 festoon bulbs, 10 W, 38 mm
- indicator:
- 1-pole, 21 W, bayonet fitting.
- rear fog light:
- 1-pole, 21 W, bayonet fitting.
It is advisable to write your chassis number and key number in below, as this may be useful when ordering parts or in the event that the key is lost.
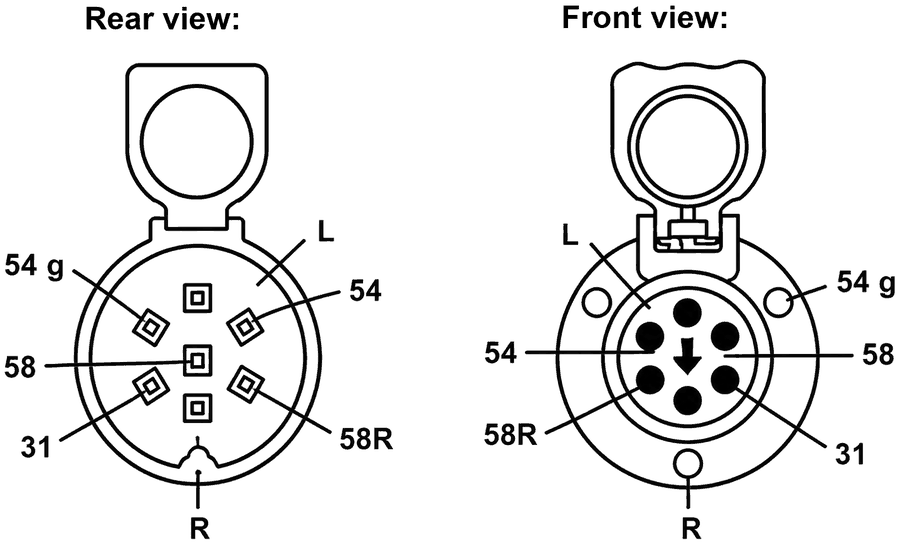
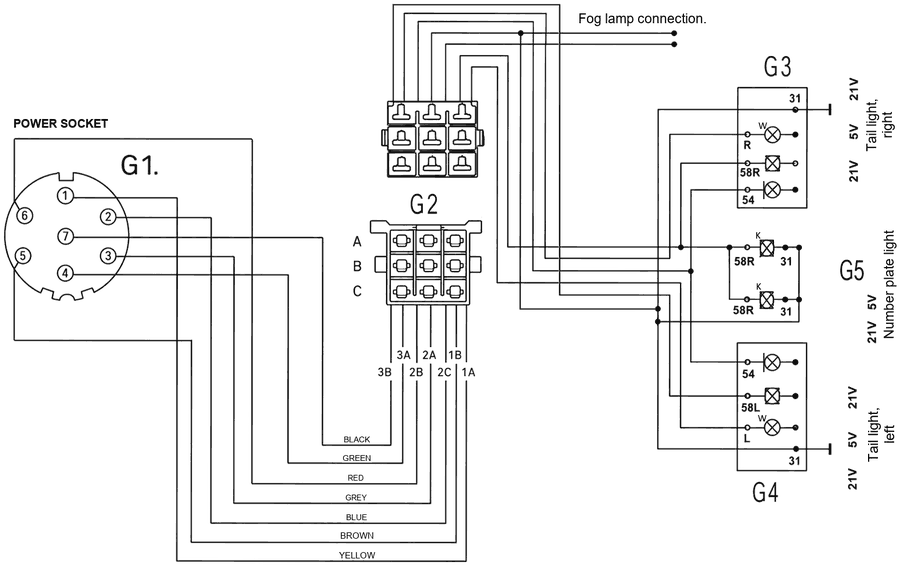
- 54
- = brake light.
- 58
- = left-hand tail light
- 58R
- = right-hand tail light
- 31
- = earth
- L
- = left-hand indicator
- R
- = right-hand indicator
- 54G
- = permanent live
or fog light.
Page 5
LOAD YOUR ALPEN KREUZER THE RIGHT WAY.
The little drawings below show some of the mistakes you might make as a new Alpen Kreuzer camper.
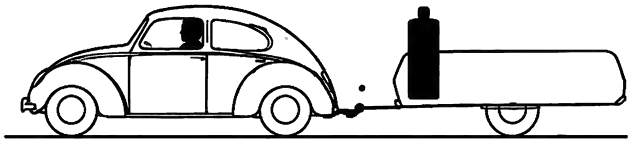
1. too much weight at the front:
result: the handling of the towing car is greatly reduced. Increased load on the rear axle, the chassis and the body of the car. Poor braking.
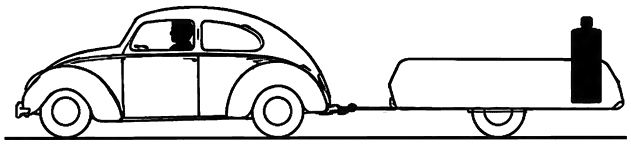
2. too much weight at the rear:
result: serious risk of snaking, and poor braking. Mind the coupling height of the ball: it should be about 40 cm from the top of the ball to the ground.
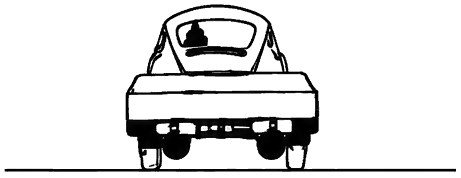
3. leaning to one side:
possible causes:
a. incorrect tyre pressure.
b. uneven weight distribution between the left and right sides.
c. incorrect wheel alignment.
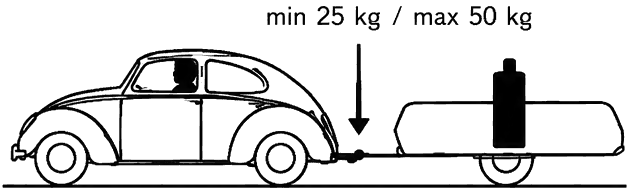
4. heaviest load over the axle:
the best possible road holding.
Loading an Alpen Kreuzer need not be difficult, as long as you start from the principle that the weight must be distributed evenly between the left and right wheels, and that everything heavy must be packed as close to the axle as possible. The noseweight should be about 25 kg. This can be checked with a special noseweight gauge. See our accessories booklet.
COUPLING UP TO THE CAR.
1. Check that the 4 jacks are wound up.
2. Swing the coupling, using the jockey wheel, over the ball.
3. Take hold of the handle of the ball coupling in such a way that the locking button can be pressed in with the thumb of your right hand or the index finger of your left hand. Then turn the handle forwards and upwards, after which the coupling is lowered onto the ball. The handle is then pressed down again until the locking button springs back out. Check that the coupling is properly secured by pulling the handle upwards without pressing the locking button.
4. Fit the connecting cable and check all the road lighting on the car and on the Alpen Kreuzer.
5. Attach the handbrake breakaway cable to the coupling.
6. Raise the jockey wheel and secure it. Clamp the last part tight with the handle on the drawbar, so that the wheel can no longer turn.
Page 6
7. We recommend a drawbar lock on the ball coupling as extra security against theft. (see accessories booklet)
8. Since the ball of the towbar must always be slightly greased, a ball cover is also a useful item for keeping grease off your clothes. (see accessories booklet.)
RUNNING IN AND GENERAL MAINTENANCE.
After delivery, or if you have owned the Alpen Kreuzer for some time, after every winter lay-up, proceed as follows:
1. Take a short test drive of 3-4 km.
2. Call in at a garage on the way and have your tyre pressures checked. For the Alpen Kreuzer with 520x13" tyres we recommend a pressure of 2 atm.
Note: unequal tyre pressures can cause a risk of snaking. (so keep the tyres at the same pressure.)
3. In the case of a new delivery: after the first run, tighten the wheel nuts immediately. This is also the reason why the wheel trims are supplied loose, so that you will not forget. No wheel trims with PEITZ brakes.
4. You may hear a squeaking noise just after delivery. Do not be alarmed. It happens that the oil seals of the wheels make this squeaking noise because they still have to bed in. It does no harm, and the noise stops of its own accord in time.
5. After 2000 km, check whether the wheel bearings have developed play, and inspect the bolted joints on the axle, the coupling and the drawbar. Spray the hinges of the front, rear and large lids (where fitted on your type of Alpen Kreuzer) with penetrating oil.
6. Every 10,000 km or every 3 years, re-grease the wheel bearings with genuine wheel bearing grease and check the hub seal.
7. When removing and refitting a wheel, take care that the nuts are fitted with the tapered side towards the rim.
8. Chassis maintenance. There are grease nipples on the 2 brake cables. These must be greased every year (do not put in too much grease, as there is otherwise a risk of pumping it through to the brake shoes, which could then become greasy and stop working). The sliding member on the drawbar should also be greased regularly. To do this, undo the clamp around the rubber gaiter and slide it back a little, after which greasing is possible.
9. If the drawbar has been removed during winter lay-up, first fit the brake rod to the plate using the pin, washers and split pin. Then fit the bolts of the drawbar. First screw on the thick nuts and tighten them firmly, then tighten the thin nuts as locknuts. So do not slacken the nut on the brake rod, as that would alter the brake adjustment. Check that the drawbar is firmly secured and has no play. If it does, always slacken the thin nut first and start again by tightening the thick nuts further. Then tighten the thin nuts firmly against the thick nuts again.
10. For the adjustment and maintenance of the overrun brake we refer you to the separate instructions on the subject.
Page 7
GENERAL ADVICE.
A full inspection is of course carried out before delivery, but good maintenance is required afterwards as well. You should pay attention to the points mentioned above, of which we again draw your attention to a few important ones:
For winter lay-up, observe points 5 and 8. Also grease the threaded ends of the jacks to prevent rust. Make sure the tents and mattresses are dry before the caravan is finally put away, so that mould and damp are not given the chance to ruin your valuable property.
Does your Alpen Kreuzer have a spare wheel on a hanging bracket? Then it is worth fitting an extra bolt in the slotted holes next to the nut fixing and, better still, fitting a padlock. This prevents your spare wheel from being stolen and also gives you a second safeguard in case the bolt should vibrate loose.
ADJUSTING THE OVERRUN BRAKE WITH AUTOMATIC REVERSING.
If you are storing the Alpen Kreuzer for a long period without the drawbar, proceed as follows:
a. Remove the bolts and nuts from the connecting piece of the drawbar.
b. Detach the handbrake rod by removing the split pin on the brake cable side. (do not slacken the adjusting nut under the handbrake.)
c. Hang the brake cable up at the front of the chassis with a piece of string, so that it stays taut and does not fall to one side when the Alpen Kreuzer is folded down. This prevents the brake cable from "kinking".
Before using it again, check the braking system so that proper braking is assured. (A check before every long journey is, incidentally, also highly advisable.)
1. Check that the pivot point of the brake rod under the handbrake turns smoothly (this is the round bush, held in a bracket, in which the front of the brake rod is fixed). Grease this pivot point regularly, as otherwise the brake rod could be bent when the handbrake is pulled up. If the drawbar has been off, check that the split pin at the other end of the brake rod has been properly refitted. For winter lay-up we advise not leaving the caravan with the handbrake on.
2. Pull on the ball coupling until the sliding member behind the coupling is fully extended.
3. Jack up the rear of the Alpen Kreuzer so that both wheels are clear of the ground (use a separate jack for this; do not use the Alpen Kreuzer's own jacks, as they are built too lightly for this and serve only to level the caravan).
4. Push the handbrake fully down. There should then be no braking action and the wheels should turn freely in the forward direction.
5. Pull the handbrake up to the 1st position (1st notch), that is, 15 to 20 cm up. If you now turn the wheels forwards, the brake shoes should just begin to rub.
Page 8
6. If this is correct, pull the handbrake fully up; the wheels must then be locked in the forward direction.
7. If the brake does not work as described, readjust it as follows:
a/ Turn the adjusting nut on the brake rod, under the handbrake, to the right when the brake needs to be set a little tighter.
b/ and slightly to the left when it needs to be set a little looser.
The basis of a good adjustment is that the brake shoes should just rub when the handbrake is pulled up to the first position.
8. If it is not possible to adjust the brakes in this way, because the adjustment at the wheels is too tight or too slack, or because the braking differs between the wheels, the brake shoes must be readjusted, which is done as follows:
a/ pull the handbrake up to the first position.
b/ prise out the black rubber plug behind the brake backplate with a screwdriver (on the inside of the wheel)
c/ behind the rubber plug there is a toothed wheel that can easily be turned with a screwdriver. With it you can adjust the brake shoes of each wheel inwards or outwards until they just rub, as also described under point 4.
d/ then check again as described above, starting at point 3, up to and including any readjustment of the adjusting nut, point 6.
MAINTENANCE OF THE BODYWORK.
Wax the bodywork with car wax, just as you would a car.
Deal with any damage to the chassis and bodywork caused by stone chips or scratches as soon as possible. For this purpose Alpen Kreuzer also supplies aerosol paint in the colour of the bodywork and tins of chassis paint. Deposits such as resin on models with a fixed lid can be removed with soda, for example (diluted with water and wiped off with a cloth).
MAINTENANCE OF THE TENTS.
With new Alpen Kreuzers an aerosol of proofing agent is supplied as a service for caravans with cotton roofs and side walls. As an extra, caravans with a synthetic "ten Cate" roof are also supplied with a bottle of seam sealer for the roof seams.
With new tents it can happen that the tent is not yet completely watertight during the first heavy shower, because the threads of the seams still have to "swell". We advise you not to start proofing straight away, because in by far the majority of cases the problem resolves itself once the tent has been wetted a few times.
If you nevertheless decide to give certain areas extra proofing, first read the enclosed instructions carefully and follow the directions exactly.
For the life of the tent it is absolutely essential to ventilate well during use, by means of the mesh ventilation openings fitted in the tent.
Any stains on the tent canvas must never be removed with soap or other chemical agents, as this would cause leaks. Blowing soap bubbles may be fun for children, but never let it be done in the immediate vicinity of the tent.
Page 9
There are species that cause staining, and even small holes in the roofs, when they land on the tent canvas.
Clean the tent canvas with a soft brush only, by brushing it down. Alpen Kreuzer supplies various kinds of proofing agents, both in aerosols and concentrated, and in several colours. Bottles of seam sealer and aerosols of anti-mould product are also available. See the accessories brochure.
For your information, below is some advice from the ANWB (the Dutch motoring association) on cleaning and proofing tents.
CLEANING THE TENT.
A tent that stands in one place for a long time gets dirty.
There are 2 things you can do about it:
1. Pay no attention to it and think: "better watertight than clean."
2. Clean it thoroughly and proof it again.
As long as the tent is still fairly new (1 or 2 seasons) the first is to be recommended. On most cotton tents the water repellency of the canvas remains sufficient to camp in it even in really bad weather. If you try to remove stains with special cleaning agents, you will irrevocably damage the proofing. You will then have to make those areas water-repellent again with aerosols or brush-on preparations.
The best thing, however, is to tackle stains with clean water and a soft brush only. You can then go over the treated area again with an aerosol just to be safe. If the tent is 3 or 4 years old, it may be time to proof it completely again.
PROOFING.
A job not to be taken lightly. But it is worth giving your tent a thorough overhaul once every 3 or 4 years (with intensive use, somewhat sooner). How do you go about it?
- Choose a fine weekend. Pitch the tent nice and taut and clean it thoroughly. Simply brush it down with a brush that is not too hard.
- Tackle dirt and unsightly stains with a brush and clean water if need be. But take care not to damage the fabric. Do not use detergents! Allow to dry thoroughly.
- Then take a proofing agent that can be applied with a brush. Put it in a bucket or bowl and spread it carefully over the tent canvas. Use a flat brush or a soft brush for this, or a flower sprayer if you are using concentrated proofing agent diluted 4 times, for example.
- Now let the tent dry for at least 24 hours if possible. You can let it dry on the campsite, or strike it carefully after a few hours, fold it loosely and then let it finish drying at home in a dry place, in the loft for instance. For a good result it is worth considering proofing both the outside and the inside. If that seems excessive, treat the outside only. If the tent was leaking badly, it is advisable to repeat the treatment after 24 hours. Keep proofing agents out of the reach of children.
FOLDING THE TENTS.
When folding the tents, care must be taken... that all the zips are open, as otherwise folding could put too much strain on the zips and the canvas, resulting in certain zips working badly or not at all, or in the canvas tearing.
Page 10
When folding down, it is not advisable to load any further luggage, apart from the mattresses, between the tents and the lid or cover sheet. That space is intended for tents and mattresses only and not as extra luggage space!
The main tent is fitted with plastic windows. If these are still wet when you fold down, it is advisable to fold these large plastic windows in such a way that they do not lie on the tent roof. Plastic allows no ventilation, so slight discolouration of the canvas can occur, which is not in itself serious, but is not very attractive. The same naturally applies to the awning.
Particular care must be taken that the plastic windows do not get trapped between the black rubber seals on the lid and the bodywork. This can cause brown streaks on the plastic windows which are practically impossible to remove!
We would also point out, perhaps unnecessarily, that for the preservation of the Alpen Kreuzer tents it is absolutely essential that they are not left wet inside the caravan. Always fold the tents away "dry", otherwise the damp gets in!
USING THE SUN CANOPY.
The sun canopy must be treated as such. In rain or wind a canopy can be torn away by the wind, or a pocket of water can form in it and tear it. If you are going to be away from your Alpen Kreuzer for a longer period, we advise you always to take the sun canopy down or, in any case, to lower the front corner poles in rain or to angle them inwards, so that the rainwater runs off better. Damage arising from this is not regarded by Alpen Kreuzer as covered by the guarantee.
CLAIMS CONCERNING TENTS.
Claims concerning tents are handled as follows:
If the instructions for use given above are not observed, any damage arising from this will be dealt with at the buyer's expense only, and no claim can be made under the guarantee.
In the case of a guarantee claim, tents supplied are repaired in principle, and no exchange takes place. Any replacement of tents can only be considered when faults are reported before the Alpen Kreuzer has been used for the first time. Such claims must be made within 8 days of delivery. After that, when tents are exchanged, a normal depreciation is applied for the time the tent has already been in use, which amount is charged when such cases are repaired.
No guarantee claim is possible on zips or differences in colour. We expressly reserve the right to make changes in construction. All repairs, including those under guarantee, are carried out at the importer in Sliedrecht, and in the event of a guarantee claim the buyer/owner must arrange transport to and from Sliedrecht himself.
DRIVING WITH THE ALPEN KREUZER.
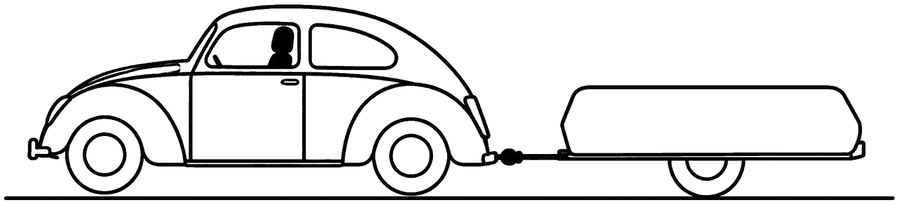
As far as driving is concerned, you will find that the Alpen Kreuzer is no problem at all. You do need to bear in mind that when overtaking you are longer than you were used to.
Page 11
You take bends exactly as you would with the car alone. Lift off before the bend and accelerate again in the bend. The Alpen Kreuzer stays in the car's track and this requires no special skill.
Driving in the mountains calls for special attention, but if you follow a few general rules this too presents no particular problems. When climbing a hill, use the clutch as briefly and as quickly as possible, and give just enough throttle for the engine to have sufficient pulling power to get the outfit moving (so take your left foot off the clutch as soon as possible). Make sure that when going down a hill you always drive in a low gear, so that you brake on the engine. It should not be necessary, or hardly necessary, to brake as well. Should you nevertheless have to brake on a steep hill, always do so in such a way that the outfit comes to a standstill in the shortest possible time. Never brake continuously from the top of the hill to the bottom. This would make your brakes overheat. Do not let yourself be pushed along by traffic coming up behind either, and if your speed is too low for the rest of the traffic, pull over calmly at the side of the road and let any queue that has formed behind you go past.
Snaking during a long descent can be caused by driving too fast. The Alpen Kreuzer is then no longer being towed but, through its own weight, tries to catch up with the car. In such a case always adjust your speed and do not brake. The law does not permit you to drive faster than 80 km/h on motorways. On descents on motorways it is advisable to pay extra attention.
REVERSING WITH THE ALPEN KREUZER.
The sketches below make clear how to reverse correctly with an Alpen Kreuzer. You must always take care that the angle between the car and the Alpen Kreuzer does not become too sharp, as the corners of the car and of the Alpen Kreuzer could otherwise touch.
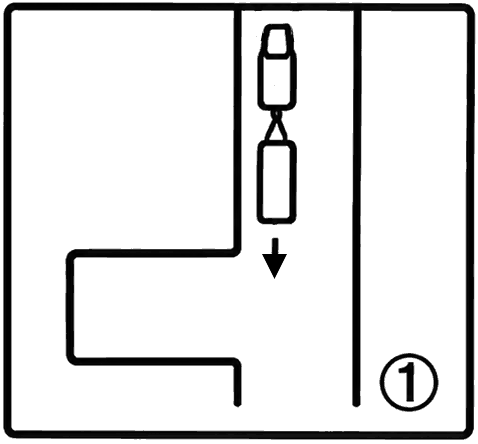
To put the Alpen Kreuzer on its pitch at a campsite, for example, you can first drive past the pitch itself and line the car and the Alpen Kreuzer up straight, one behind the other. The Alpen Kreuzer has passed the entrance by 1 to 2 metres.
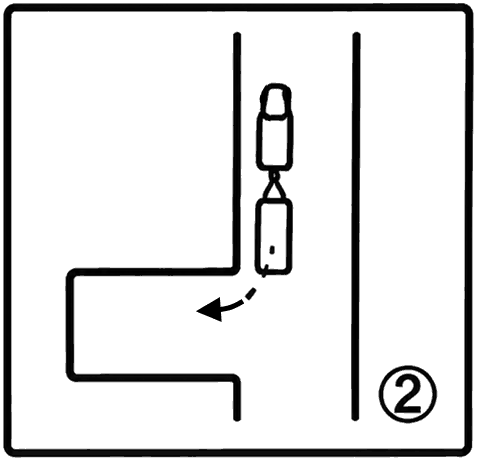
Reverse the whole outfit until the Alpen Kreuzer reaches the back of the entrance. Stopping, and while practically stationary, turn the steering wheel the other way and correct. Continue reversing, so that the car swings to the right and the Alpen Kreuzer moves off to the left.
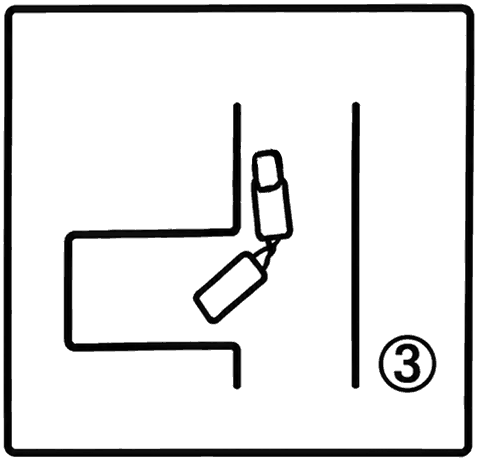
Now carry on until the car and the Alpen Kreuzer are at an angle of 45° and stop.
Now, with the wheels stationary, turn the steering wheel the other way.
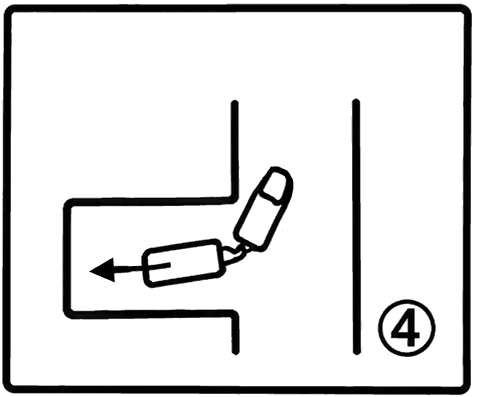
Now let the wheels come back slowly and evenly to the straight-ahead position, and reverse until the Alpen Kreuzer is on the spot you want. Before you go on holiday, we advise you to practise thoroughly on an empty square or a quiet street until you have mastered it. Besides, uncoupling and pushing it into place is of course always an option too, when you cannot judge a situation.
Page 12
USING THE BUILT-IN STAINLESS STEEL KITCHEN.
The stainless steel worktop is fitted with a gas appliance with a safety device. In use, turn the knob (or knobs) open and press first, before lighting the gas. Then hold it in for a moment until the gas stays alight. If the gas is blown out, the gas supply shuts off automatically... so when relighting, follow the same procedure: press the knob in first, light the gas and hold it in for a moment until the gas burns.
Top flaps of the swing-out kitchen:
When opening, lift the top flaps slightly to raise them out of the hinges. When closing too, lift the flaps at the sides to seat them back in the hinges. Careless handling can jam the hinges, which can bend the lids.
The kitchen flaps at the front are opened as follows:
Press the rotary knob in before opening and turn it to the left. With careless use, turning it to the right, the knob can break off. This falls outside the conditions of guarantee.
ERECTING THE CARAVAN.
Below we give you information on the order in which the ALPEN KREUZER, type ALLURE, is erected, together with a number of tips that are important for correct use.
In the initial stage of erection, 2 people are needed to open the fold-out lids and for the operations that follow.
It is important that when you erect the Alpen Kreuzer for the very first time, you pay close attention to how the tent is folded. This makes folding it away again easier.
* You already know that the rear of the Alpen Kreuzer is the entrance to the main tent. Bear this in mind when positioning it.
* After you have uncoupled the Alpen Kreuzer, level it roughly using the wind-up jockey wheel.
Erection now proceeds as follows:
1. Wind out the 4 jacks with the crank provided until they touch the ground (on soft ground, put a board or a stone underneath). Do not wind the 4 jacks up too high; taking a little weight off the suspension is permissible, but the caravan must not rest on the jacks alone; the wheels must help support it as well.
2. Take the cover sheet off the caravan and open the left-hand chain lock (2)
3. Remove the left-hand backrests. (3)
4. as well as the bag of awning poles (4), the awning (6) and the seat and back cushions. (7)
8. Swing the fold-out supports (8) up and lock them in the right-hand bed board (9).
10. Fold out the right-hand bed board and level it horizontally.
(see figure "1" at the top of the next page.)
Page 13
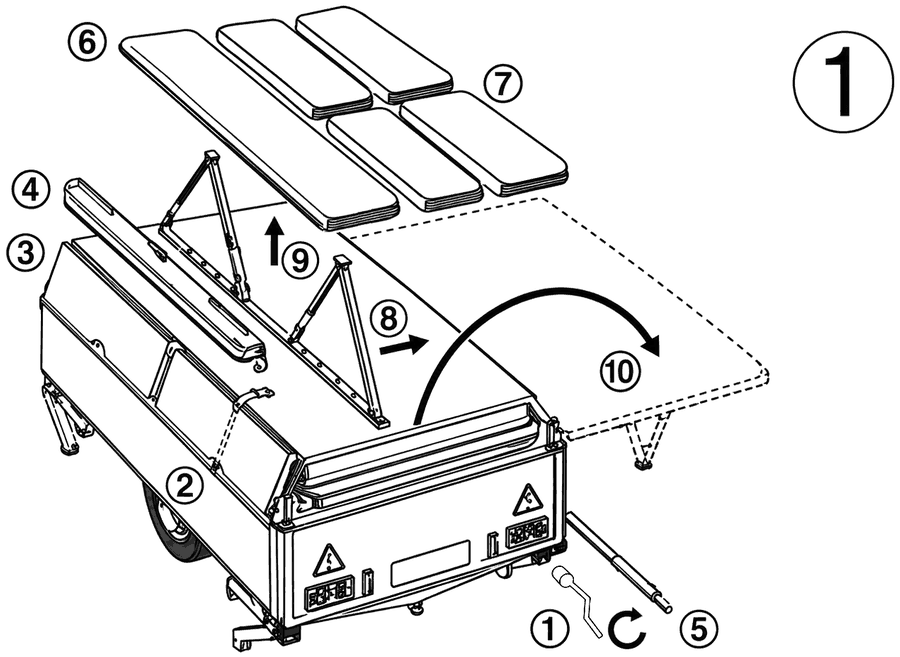
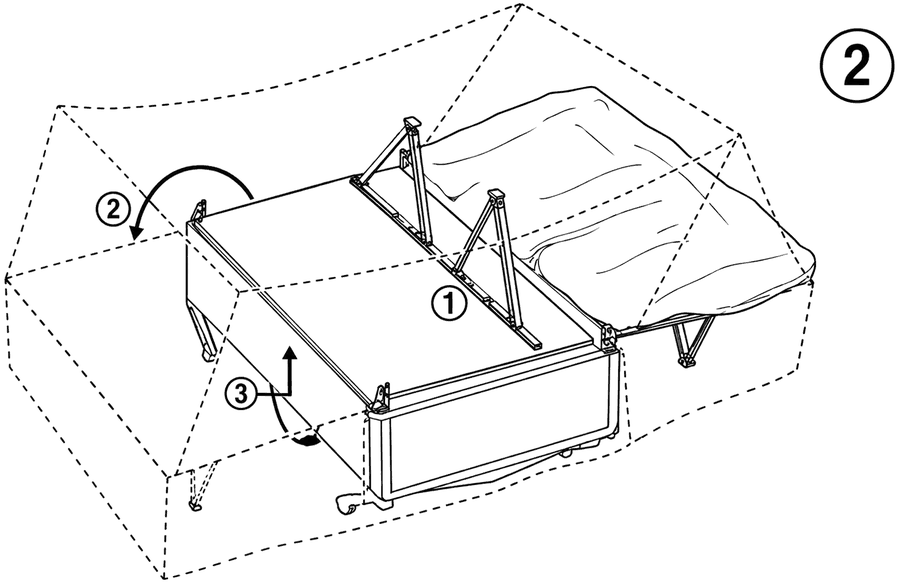
Figure 2:
1. Swing the supports of the left-hand bed board up and lock them.
2. Make sure that the door zips are open before starting to fold out the left-hand bed.
3. When folding it out to the side, also take care that the metal section fixed to the bed board does not come to rest against the side but on top of the side of the caravan body. If this looks like happening, do not force it, because you could damage the side of the caravan and the tent frame! In that case lift the underside (3) slightly and turn it further until the metal edge of the left-hand bed board rests on top of the side of the caravan body.
4. Level this bed board horizontally as well (on soft ground, put a board underneath if necessary). After these operations the main tent is already partly erected.
Note: when folding away again, all the zips must be open!
Page 14
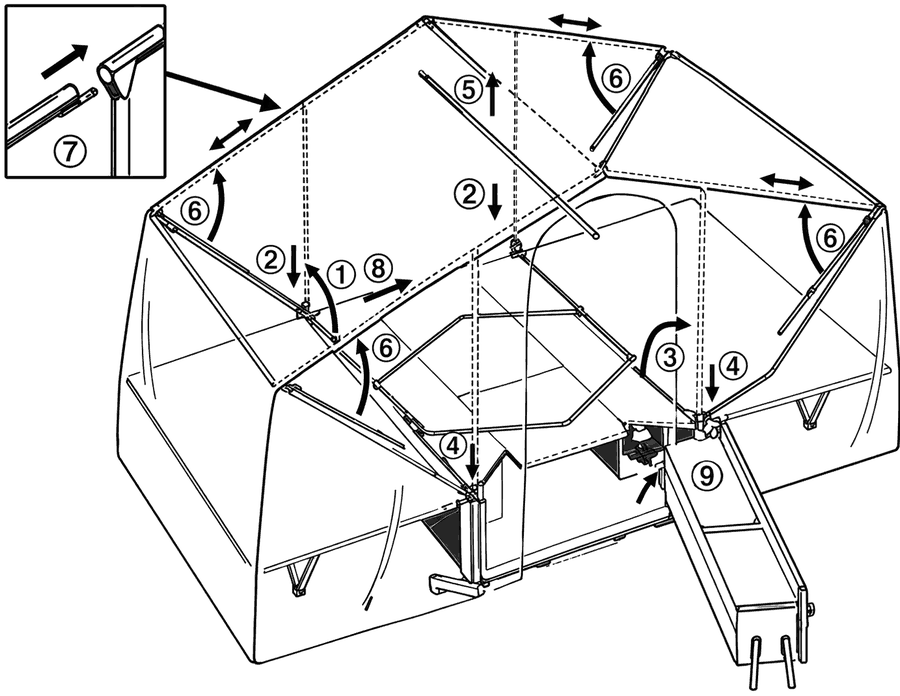
Figure 3:
1. Swing the front U-bracket (on the drawbar side) up and
2. lock it in the hinge fittings by pressing the U-bracket down on both sides.
3. Swing the rear U-bracket (on the kitchen side) up. Its uprights are telescopic and, when only the main tent is being erected, must first be pushed up to the same height as the front U-bracket. Lock this one too by pressing the U-bracket down on both sides into the hinge fittings.
4. Slide the ridge pole of the main tent (stowed on the left-hand side, next to the backrests) into the U-brackets (1) and (3) at the top on both sides.
* Note. Fitting the awning at the same time as the main tent. The rear U-bracket (3) on the kitchen side is telescopic and adjustable in height, because that makes it easier to zip the awning on. If you intend to erect the awning at the same time as the main tent, it is practical to hook the awning frame in first and zip the awning on (see the information with figures 4 and 5), and only then telescope the U-bracket on the kitchen side up and slide the ridge pole (4) into the U-brackets on both sides. This way the reach is lower and hooking in the awning frame and zipping on the awning are easier.
5. Swing the 4 fold-out roof poles up from the corners and slide them into the U-shaped brackets (1) and (3) at the top on the sides; tension and lock them. (see detail 7)
6. Fasten the tent skirt under the window on the drawbar side with press studs.
7. Note: when swinging the kitchen in with the tent folded, make sure that the corner of the kitchen (see arrow) passes under the canvas. To do this, slide the infill board behind the table top as far back as possible towards the kitchen and, if necessary, lift the canvas slightly by hand, because otherwise, if the kitchen is forced, the tent could tear there on the corner of the kitchen.
Page 15
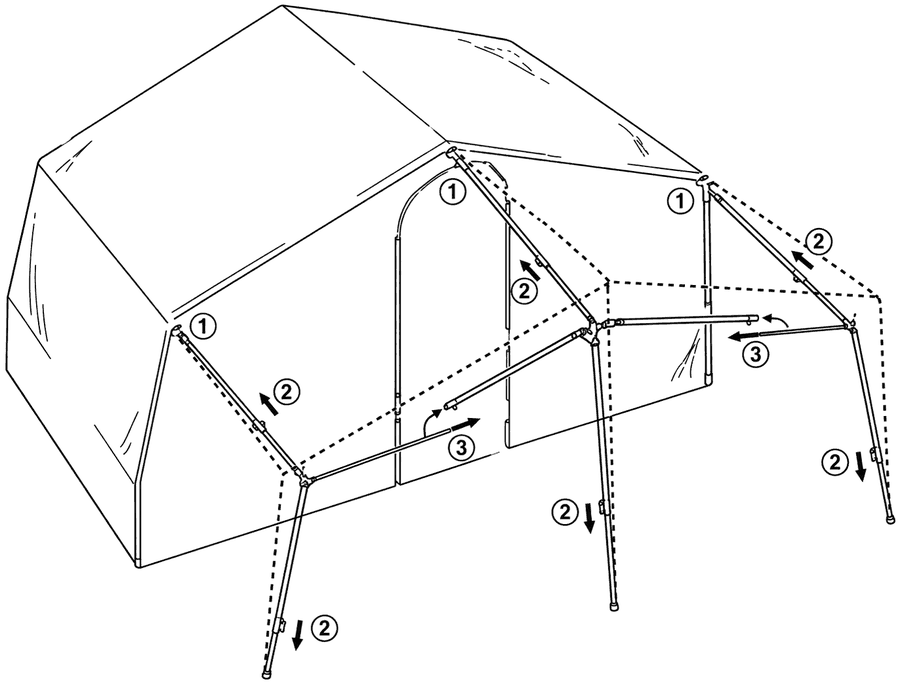
Figure 4:
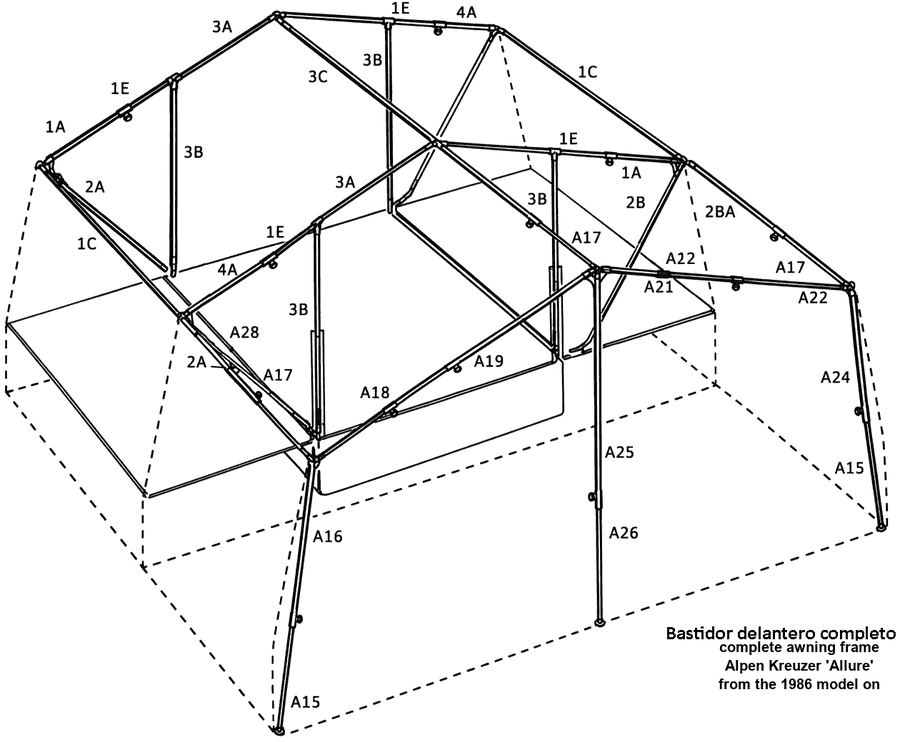
1. The awning frame consists of 3 parts. Hook the roof poles on the awning side into the main tent frame. When hooking them in, hold the poles at an angle, and after hooking them in push them up to a more horizontal position.
2. Tension the roof poles and uprights slightly.
3. Join the front cross poles to each other.
Page 16
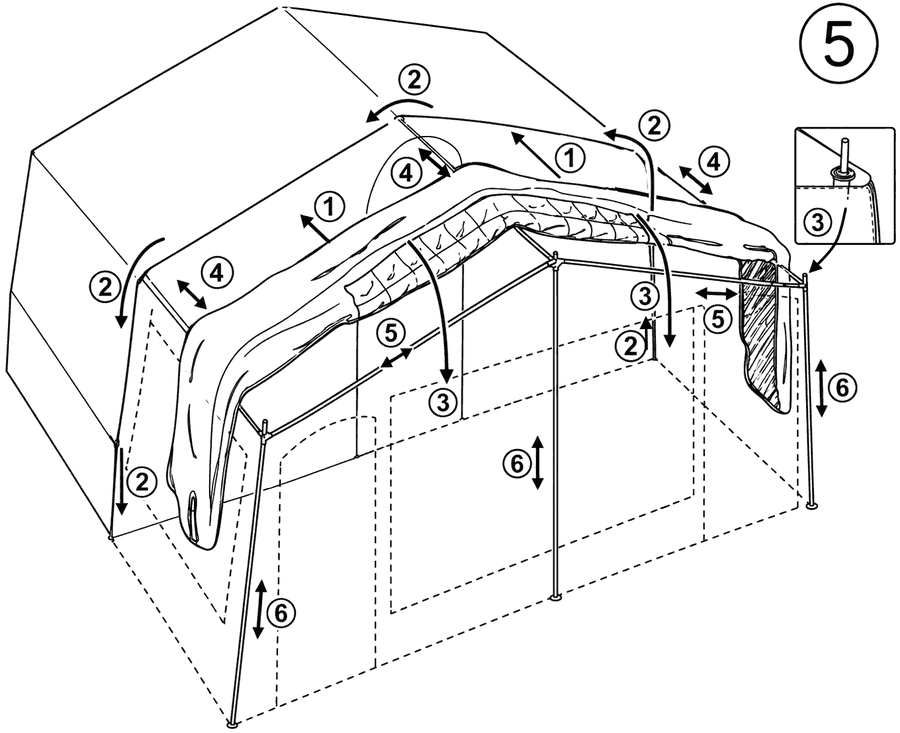
1. Lay the awning over its frame with the zip facing the main tent.
2. Engage the zip and, starting from the bottom, pull the slider through to the other side.
3. Unfold the awning further and fold it down at the front and the sides; hang the 3 eyelets at the front over the pins of the front uprights.
4. Zip-on sun canopy.
If you wish to attach the canopy at the same time, zip it on first, without fully tensioning the awning at the front yet.
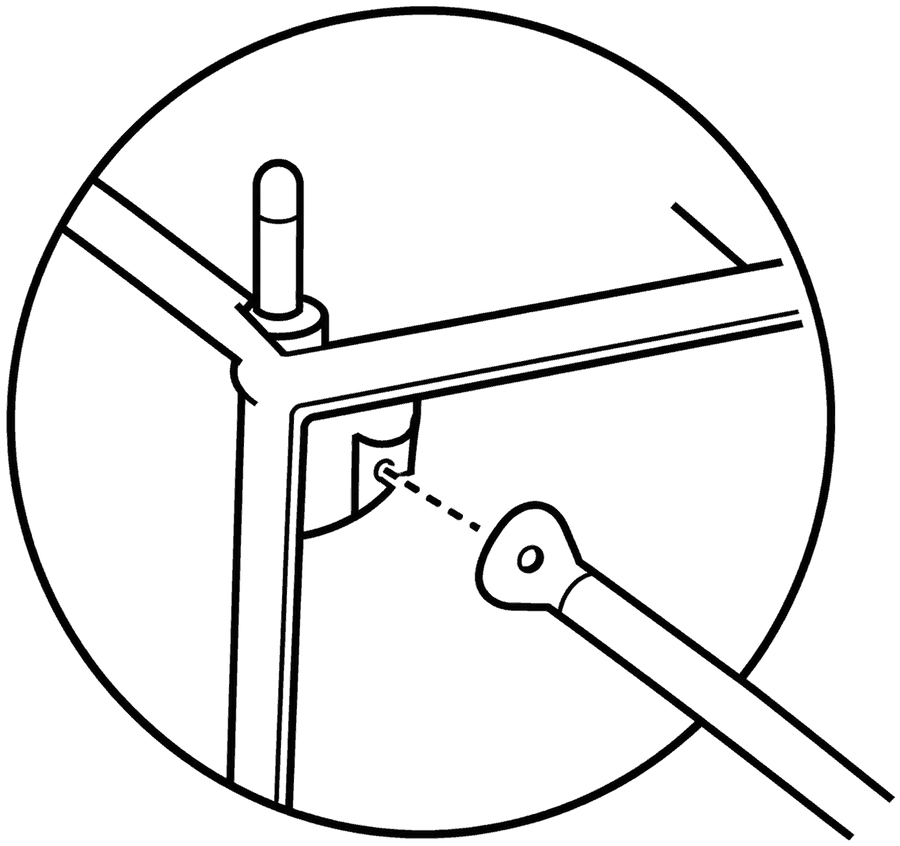
Then push the roof poles through the slots in the front wall of the awning and lower the flat ends over the tips of the 3 uprights of the awning frame, so that the flat ends of the canopy poles sit between the top of the awning uprights and the awning roof. (see sketch)
Then finish erecting the canopy, and tension the awning wall and the canopy.
Note: the two canopy roof poles with the bent ends must be inserted at the outer sides (to prevent damage to the tent canvas at the corners), and the one with the flat end in the middle.
Page 17
5. Only now extend and lock the depth poles of the awning.
6. Then extend and lock the cross poles of the awning.
7. Extend the awning uprights to the right height and lock them.
Finally you should:
a. Attach the awning ties (and the canopy ties) to the tent frame.
b. Fasten the draught skirt under the kitchen door with press studs.
c. Tension the tent all round with guy lines.
d. Peg down the mud flap all round with ground pegs.
e. When attaching the sun canopy, bear in mind that: it is a sun canopy that must be taken down in rain or strong wind, as it may otherwise tear. In any case it is wise always to angle the front uprights inwards or to retract them partly, so that when you are away and there is an unexpected shower and/or strong wind, the rainwater can run off without a "pocket" forming in the canopy fabric.
The following interior furnishings are supplied:
9 curtains. (3x2 pieces for the window in the main tent and the two side windows in the awning + 3 pieces for the front window of the awning.)
When fitting the curtain runners for the first time, we advise folding a small pleat in the curtain fabric at each runner and fixing the runner onto it. You can then leave the runners on the curtains and slide them on and off the plastic rails by removing an end stop. The plastic curtain rails may run a little stiffly at first, which is easily remedied with an aerosol of silicone spray.
1 table cloth.
1 closing curtain for the awning with hanging spiral.
The closing curtain in the awning is fitted as follows: slide the hanging spiral through the slots in both halves of the curtain, and hook the hook of the spiral on one side through the eyelet in the canvas at the side of the main tent, around the roof pole (6) on the inside. Then hook the hook on the other side onto the cross pole of the awning frame.
2 closable inner tents with hanging spirals and hanging brackets.
Slide the hanging spirals at the front through the slots and fix the inner tents on both sides with hooks around the left-hand and right-hand roof poles. With the hanging brackets also supplied, hang the inner tents at the rear and at both sides as well, by passing the brackets through the sewn-in loops on one side and around the roof poles on the other.
Since the sides of the inner tents are cut more generously and the inner tents can therefore be tensioned diagonally forwards, it is possible to add the seat cushions to the mattresses, giving beds 155 cm wide. To prevent them "sliding", it is advisable in that case to put the seat cushions in the corner and the mattresses at the front.
1 tent ceiling for the space above the seating area, with hanging brackets.
Fitted with hanging brackets, by passing them through the sewn-in loops on one side and around the roof poles on the other.
Page 18
Folding away is in principle done in the reverse order:
1. Release the ground pegs, press studs and pegs all round and open all the zips completely.
2. Remove the curtains and the draught skirt under the caravan.
3. If you have also erected the canopy:
First lower the middle upright of the awning a little, so that you do not have to reach so high.
Release the long guy lines from the top corners at the front of the canopy, push the canopy fabric upwards onto the poles of the canopy frame, which takes the tension off the canopy. Then fasten the guy lines again provisionally to keep the canopy frame standing.
Undo the connecting zip between the canopy and the awning and fold the canopy on the tent frame into 3 parts (like a sheet). If you fold it up on the frame in this way, the canopy need not come into contact with the ground. Take the canopy frame apart and stow it.
4. The awning is folded away in the same manner.
First lower the U-shaped bracket on the main tent a little, so that here too you do not have to reach high, and then remove the awning in the same way as described above for the canopy.
5. To fold away the main tent, here too release the ground pegs, pegs and press studs where still necessary, and open all the zips.
Release the tensioners of the inner tents at the front and remove the hanging brackets from the sides. (at the rear the inner tents can stay attached and be folded away together with the main tent.)
6. Swing the 4 roof poles (6) back towards the corners and secure them against the corner uprights with elastic straps.
In wet weather we advise, before folding away any further, first laying the piece of plastic supplied over the mattresses to protect them from damp.
Remove the ridge pole.
Lift the two U-shaped brackets out of their locks and swing them down.
Swing the left-hand bed board up and fold in the supports.
Swing the right-hand bed board up and fold in the supports.
As you fold both bed boards back, at the same time tuck the canvas of the side walls in between the bed boards at the sides.
Put the loose parts back in place, that is, both backrests, the bag of awning poles, the awning, the back and seat cushions and the tensioning bar (which should be stowed at the bottom right in the side bench, next to the wheel arch). Close the left-hand bed board with the chain lock and fit the cover sheet again.
Wind up the 4 jacks and collect any pegs and ground pegs still in the ground.
7. When you have unhooked the kitchen from the caravan, check the road lighting again before setting off in any case. We would also remind you once more that when swinging the kitchen in with the tent folded, the corner of the kitchen must pass under the canvas. To do this, slide the infill board behind the table top as far back as possible towards the kitchen and lift the canvas slightly by hand, because otherwise, if the kitchen is forced, it could tear there on the corner of the kitchen.
Page 19
ASK FOR THE ALPEN KREUZER ACCESSORIES BROCHURE.
With the Alpen Kreuzer alone you are of course not finished. Although they are supplied fairly complete, you will have to obtain the accessories needed to make it habitable and to furnish it further.
Here we distinguish between things that have to be bought specially for the Alpen Kreuzer and always stay in the caravan, and other items in everyday household use. In time you will aim to buy everything separately for your Alpen Kreuzer and leave those things in it, and so in a sense set up a second home. For extra accessories such as a groundsheet, sun canopy, heating, inner tents, gas bottles and sleeping bags, etc., we refer you to the Alpen Kreuzer accessories brochure.
When ordering accessories and spare parts, please always quote the chassis number, so that we can establish the year of manufacture and the type. This number is on your import declaration (Netherlands). It is also stamped into the drawbar and into the front chassis member.
We expressly reserve the right to change prices, construction and colours, both of the Alpen Kreuzers and of the accessories supplied. All deliveries and (guarantee) repairs and exchanges are ex Sliedrecht.
Page 20
COLOUR CODE OF THE LIGHTING WIRES
Page 21
Page 22
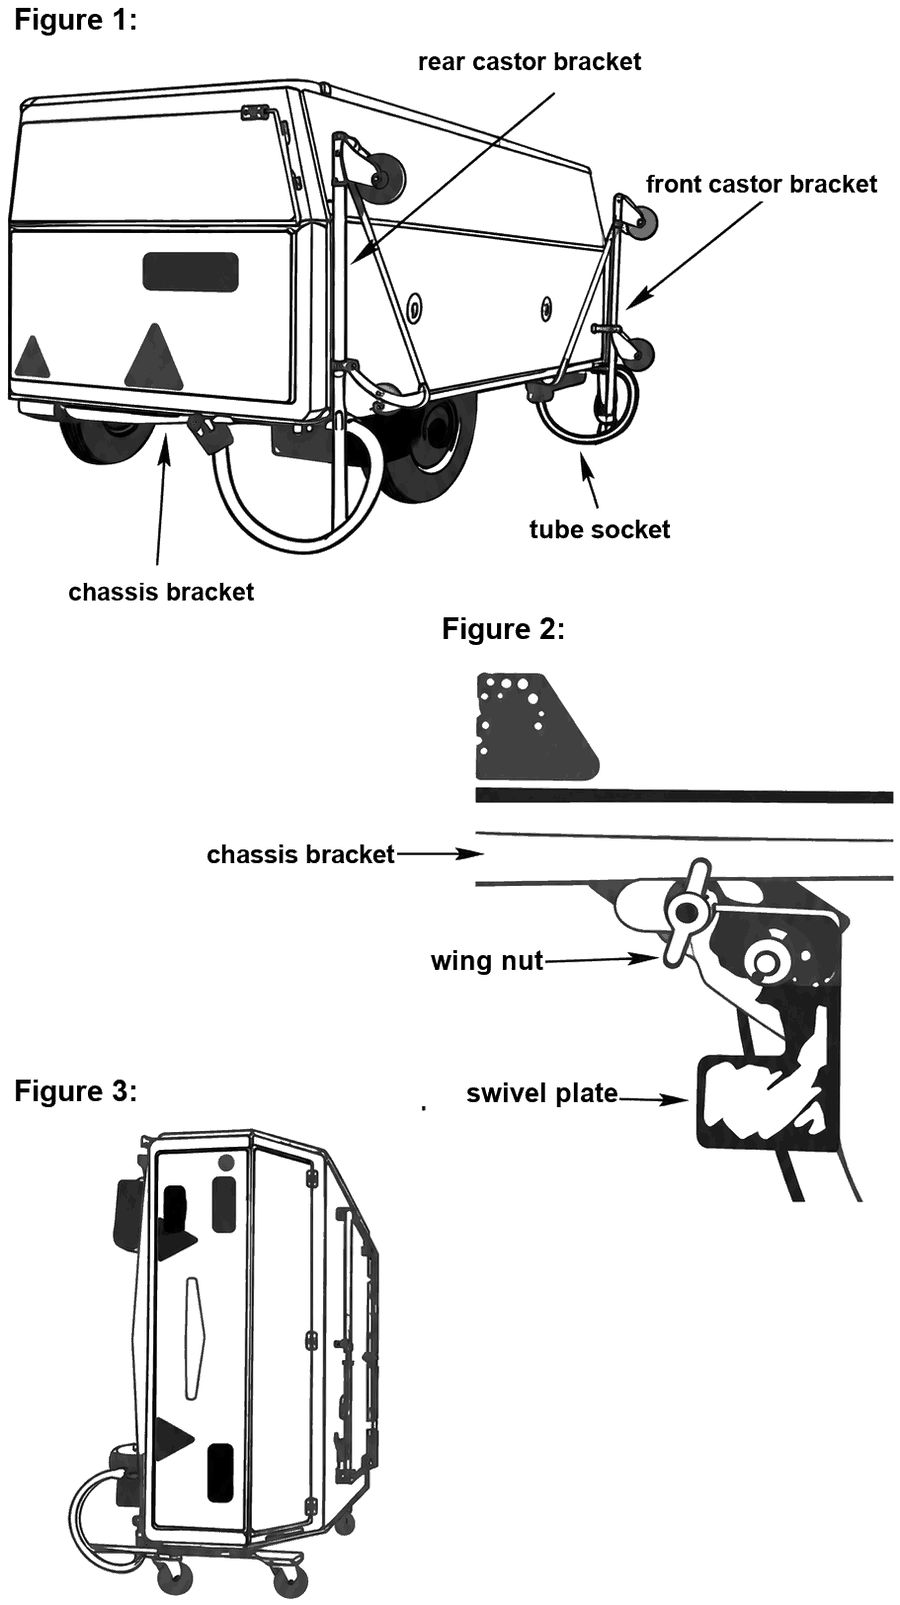
1. The Alpen Kreuzer is placed level and the handbrake is applied. (see fig. 1.)
2. The front and rear castor brackets are slid into the tube sockets on the chassis. (see fig. 1)
3. The quick-release catch is fitted to the chassis bracket and tensioned. (see fig. 2)
To do this the wing nut must be slackened and the swivel plate folded down. The catch must be slid onto the chassis bracket, then the swivel plate turned back and secured with the wing nut. (see fig. 2)
4. To stabilise the side of the caravan, fasten the metal strips pivoted on the tilting bracket into the slot on the chassis with a wing nut. (see fig. 1.)
The tilting brackets are now ready for use. With 2 people, push the caravan over onto its side over the castor brackets. The Alpen Kreuzer can then be manoeuvred into the smallest corner, since the drawbar and the wheels can also be removed.
MOBILE TILTING BRACKETS FOR ALPEN KREUZER
Page 23
WHAT WE WISH YOU FOR YOUR HOLIDAY......
is plenty of fine weather, no end of fun and no breakdowns on the way. To the first 2 wishes we can contribute little, but with a view to the last, here are a few handy tips (as a reminder of what is already set out in more detail in this booklet):
Before you couple your Alpen Kreuzer up behind the car for the journey...
* The tyre pressures must be equal and 2 atm. Your filling station will be glad to check them for you. Also make sure that after loading the noseweight is about 25-35 kg. It increases your safety and driving comfort.
* In any case tighten the wheel nuts on both wheels after the first 50 km. This is sometimes forgotten, and yet it is done in a moment. The wheel trims are deliberately supplied loose to remind you. No wheel trims with PEITZ brakes.
* Your gas cooker: let it burn for a moment and check with pans that everything works and that there is no gas leaking anywhere. In any case use a 30 mbar pressure regulator with a 1/4" left-hand threaded connection. Chlorine is the enemy of stainless steel, and to avoid damage and browning of stainless steel sinks this product must on no account be used. Cobwebs can block the air intake tubes (next to the control knobs), causing one or more burners to stop burning properly. Blowing them through with the vacuum cleaner is then the answer.
* Has your Alpen Kreuzer been stored in the garage with the drawbar off? Then always check before the first trip that the drawbar bolts are properly tightened and that the braking system works as it should.
* Before setting off, always check the coupling and the road lighting, and make sure the handbrake is pushed fully down.
* Do you have all the papers with you for the countries you are going to visit? You have received an invoice and an import declaration from Alpen Kreuzer b.v. or from your local Alpen Kreuzer dealer. Always take these with you. For the road tax disc, apply to the tax office. For any other documents that may be necessary we advise you to consult the ANWB information.
With this handful of tips we hope, as the supplier of your Alpen Kreuzer, to spare you and yours a great deal of annoyance on the road that could have been prevented at home. Do not get behind the wheel before you have gone through the "checklist" above. That this will certainly benefit your holiday enjoyment is the firm conviction (and sincere wish) of
SLIEDRECHT - HOLLAND
Page 24
OPENING HOURS SLIEDRECHT:
| SHOWROOM: | Monday to Friday | 8.30 - 12.00 h |
|---|---|---|
| 13.00 - 17.30 h | ||
| Saturday | 9.00 - 17.00 h | |
| Thursday evening, showroom open continuously all year round (late-night shopping) until 21.00 h | ||
| WAREHOUSE AND DELIVERY: | Monday to Friday | 8.30 - 12.00 h |
| 13.00 - 17.00 h | ||
| Saturday morning | 9.00 - 12.00 h | |
| and from 1 April to 31 August also: Thursday evening, 18.30 - 21.00 h | ||
No new Alpen Kreuzer folding caravans or touring caravans are handed over on Saturday mornings or Thursday evenings.
Closed on Sundays and public holidays.
REPAIRS AND REPEAT ORDERS.
When repairs have to be carried out by Alpen Kreuzer b.v., it is advisable to have this done in autumn or winter. This is to your advantage as well as ours, since in spring and summer long waiting times can arise because our works are much busier then. If any damage is at the expense of an insurer, please note that all prices quoted for repairs are ex Sliedrecht, and that in that case you must settle any transport costs with your own insurer yourself. We also ask you to have servicing (for which, among other things, a brake test bench is available at our works) carried out preferably in autumn or winter.
CLOSING WORDS.
We know that in publishing this Alpen Kreuzer instruction booklet we have met the wish of many Alpen Kreuzer buyers. To the more experienced campers a great deal of the information provided will be familiar, but it is important to keep testing that experience against practice and to keep adding new knowledge to it.
We have of course compiled this booklet from the information available to us, including ANWB sources. It is intended to give you an entirely non-binding picture and we can never be held liable for the consequences of any differing regulations and/or incorrect information.
As interest on the money invested, we finally wish you plenty of sunshine and unforgettable holidays with your Alpen Kreuzer which, if you use it properly, can become a place of relaxation and a second (holiday) home.
Management and staff of